
BDD (Behavior-Driven Development) testing is an Agile software development methodology where system requirements are written as human-readable "scenarios" that describe how the software should behave from the user's perspective.
In traditional testing, we test code: "If I call function add(2, 2), does it return 4?" In BDD, we test behavior: "Given I have 2 apples, when I add 2 more, then I should have 4 apples."
Why is BDD Useful? It solves the biggest problem in software: Miscommunication.
1. Living Documentation
- Traditional requirements documents (PDFs, Wikis) get outdated the moment code is written.
- BDD Feature files ARE the tests. If the code changes, the documentation usually fails the test, forcing you to update it. You can never lie in your documentation.
2. A Shared Language (The "Ubiquitous Language"):
- Developers, Product Managers, and QA all speak different languages.
- BDD forces everyone to agree on a single, English-based format (Given/When/Then). This eliminates "I thought you meant X" errors.
3. Focus on Value:
- It stops developers from getting lost in technical details ("I need a database schema").
- It forces them to start with user value ("I need the user to be able to save a task").
The Problem BDD Solves (The Telephone Game)
Without BDD, software development is like a game of "Telephone":
- Client: "I want a secure door."
- Manager: "They want a heavy steel door."
- Developer: (Builds a vault door that takes 5 minutes to open)
- Client: "I just meant a door with a lock!"
With BDD: The Client, Manager, and Developer agree upfront: Scenario: Secure Door Given the door is closed When I swipe my keycard Then the door should unlock in under 1 second
Now, the developer builds exactly what is needed. No more, no less.
The Big Picture
Here is what we are building. We are creating a bridge where English requirements drive Python code.

In this tutorial series, we're going to build a fully functional To-Do List API.
Part 2: Setting the Stage with Django, DRF, and pytest-bdd
Step 1: The Modern Setup
Gone are the days of sluggish setups. We're going to use uv, a blazingly fast package manager for Python.
What is uv?
uv is a modern, blazingly fast package manager for Python, written in Rust. It replaces tools like pip, pip-tools, and virtualenv.
Why use it?
- Speed: It is 10-100x faster than pip.
- Safety: It uses a lockfile (uv.lock) to ensure everyone on your team has the exact same package versions.
- Simplicity: It manages both your virtual environment and your packages in one tool.
# Create a virtual environment
# A virtual environment acts like a sandbox.
uv venv

# Activate the virtual environment
source .venv/bin/activate
Now, let's install our power trio: Django, DRF, and pytest.
# Install dependencies
uv add django djangorestframework drf-spectacular pytest pytest-django pytest-bdd
Pro Tip: uv automatically creates a uv.lock file. Always commit this to Git! It ensures your teammates get the exact same versions of libraries as you.
Step 2: Configuring the Test Runner
Create a file named pytest.ini in your project root:
[pytest]
# Connects testing to Django
DJANGO_SETTINGS_MODULE = todo_project.settings

# Finds test files
python_files = tests.py test_*.py *_tests.py
Step 3: Organizing for BDD
BDD requires a specific structure. Here is exactly what each file does:
What is conftest.py?
You'll see a file called conftest.py in the tests/ folder. This is a special pytest file used for Fixtures.
What is a Fixture? (Full Explanation)
In the world of testing, a "Fixture" is a reliable baseline. It is the fixed state that exists before a test starts.
Think of it like a Sous-Chef in a professional kitchen.
- The Chef (The Test Function) focuses on cooking (Executing steps).
- The Sous-Chef (The Fixture) prepares everything beforehand: chops the onions, heats the pan, and buys the ingredients.
In our code:
- Setup: The fixture creates a resource (e.g., "Spin up a fake database", "Create a logged-in user").
- Use: The test uses that resource.
- Teardown: The fixture cleans up the mess (e.g., "Delete the user", "Rollback the transaction").
Why use conftest.py?
This file is a "Global Fixture Container". Any fixture defined here is automatically available to all tests in the same directory (and subdirectories). you do not need to import them.
- Without conftest: You have to write from conftest import api_client in every single file.
- With conftest: You just add api_client as an argument: def my_test(api_client):. Pytest finds it automatically.
tasks/
├── features/
│   └── manage_tasks.feature
│       # THE RULES. Written in English.
│       # Example: "Given I have 5 dollars..."
│
├── tests/
│   ├── __init__.py
│   ├── conftest.py
│       # THE TOOLBOX.
│       # setup tools like "Create a fake database" or "Start a fake browser".
│
│   ├── test_bdd_tasks.py
│       # THE TRANSLATOR.
│       # Python code that connects the English Rules to the Toolbox.
│       # @given("I have 5 dollars") -> db.user.set_balance(5)
With our environment ready, we're prepared to write our first "Feature". In Part 2, we'll write our first scenario in plain English and make it pass!
Part 2: Writing Your First Feature
Welcome back! In Part 1, we set up our environment. Now, we get to the fun part: telling our code what to do using plain English.
In BDD, we use a language called Gherkin. It uses keywords like Given, When, and Then to describe user behavior. This file serves as both your requirement documentation and your automated test.
The Feature File: Defining Requirements
Let's define a simple requirement: A user should be able to create a new task.
Crash Course in Gherkin (The Language of BDD)
What is Gherkin?
Gherkin is a simple, English-like language used to write software requirements. It was originally created for the Cucumber testing framework but is now the industry standard for BDD.
Why use it?
It solves the "Lost in Translation" problem.
- Developers speak code (Python, SQL).
- Business Users speak features ("I want a shopping cart").
- Gherkin is the middle ground. It is precise enough for computers to understand, but readable enough for your boss to understand.
The Golden Formula: Given-When-Then Every scenario follows a State Transformation logic:
Given (The Setup):
- Describes the world before the user does anything.
- Think: "Assume I am logged in" or "Assume the database is empty".
When (The Action):
- Describes the single thing the user does.
- Think: "I click the button" or "I send a POST request".
Then (The Check):
- Describes the world after the action.
- Think: "I should see a success message" or "The task should be in the database".
Why "Scenario Outline"?
Notice we are using Scenario Outline instead of just Scenario.
- Scenario: Runs once. Good for unique stories.
- Scenario Outline: Runs multiple times with different data. Good for forms and bad-data testing.
In our file below, we use <title> as a variable. Pytest will run this test 3 times, once for each row in the Examples table (Groceries, Bills, Dog).
Create tasks/features/manage_tasks.feature and stick this in:
Feature: Manage Tasks
    # The 'Feature' describes the high-level functionality being tested.
    As a user
    I want to manage my to-do tasks
    So that I can keep track of what I need to do

    Scenario Outline: Create new tasks
        Given the database is empty
        When I send a POST request to "/api/tasks/" with title "<title>"
        Then the response status code should be 201
        And the task "<title>" should exist in the database

        Examples:
            | title          |
            | Buy Groceries  |
            | Pay Bills      |
            | Walk the Dog   |
Read that aloud. It makes perfect sense, right? That's the power of BDD.
The Step Definitions: Making it Work
Now, we need to translate those English sentences into Python code. This happens in tasks/tests/test_bdd_tasks.py.
We'll use pytest-bdd decorators to map each line.
Setting the Context
First, we need a way to share data between steps (like saving the API response in one step and checking it in another).
import pytest
from pytest_bdd import scenarios, given, when, then, parsers
from tasks.models import Task

scenarios("../features/manage_tasks.feature")

pytestmark = pytest.mark.django_db


@pytest.fixture
def context():
    return {}
The "Given" Step
@given("the database is empty")
def database_empty():
    Task.objects.all().delete()
The "When" Step (The Action)
Here is where the magic happens. We use parsers.parse to extract data from the Gherkin string.
What is a Parser? (Full Explanation)
A parser is a translator tool. It takes a human-readable sentence and breaks it down into variables that Python can understand.
Think of it like Mad Libs for code.
- The Sentence: "I send a POST request to '/api/tasks/'"
- The Pattern: I send a POST request to "{url}"
The parser lays the pattern over the sentence.
- It sees "I send a POST request to ". Match.
- It sees "{url}" in the pattern and "/api/tasks/" in the sentence.
- It grabs "/api/tasks/" and says: "Okay function, here is your variable named url!"
This is powerful because it lets you reuse the same Python code for thousands of slightly different English sentences. You just change the variables.
The api_client argument is a special fixture from pytest-django. It acts like a fake web browser that can hit our API without running a real server.
@when(parsers.parse('I send a POST request to "{url}" with title "{title}"'))
def create_task(api_client, context, url, title):
    response = api_client.post(url, {"title": title, "status": "PENDING"})
    context["response"] = response
The "Then" Steps
@then(parsers.parse("the response status code should be {status_code:d}"))
def check_status_code(context, status_code):
    assert context["response"].status_code == status_code


@then(parsers.parse('the task "{title}" should exist in the database'))
def check_task_exists(title):
    assert Task.objects.filter(title=title).exists()
And just like that, you've connected English requirements to Python tests. In Part 3, we'll see how to leverage these steps for more complex scenarios without rewriting code.
Part 3: Leveling Up - Updating Tasks and Reusing Steps
One of the biggest benefits of BDD is reusability. Once you define a step like "Then the response status code should be 200", you can use it in every single scenario you write from then on.
Let's demonstrate this by adding a "Mark as Complete" feature.
Expanding the Feature File
Open tasks/features/manage_tasks.feature. We're going to add a new scenario.
Notice specifically the Then step. We are literally copy-pasting the exact same phrasing we used in Part 2.
  Scenario: Mark task as complete
    Given a task with title "Walk the dog" exists with status "PENDING"
    When I send a PATCH request to the task detail url with status "COMPLETED"
    Then the response status code should be 200
    And the task "Walk the dog" should have status "COMPLETED"
Implementing the New Steps
We only need to implement the new logic. Open tasks/tests/test_bdd_tasks.py.
Setting up existing data (The "Given")
We need a task to already exist before we can update it.
@given(parsers.parse('a task with title "{title}" exists with status "{status}"'))
def create_initial_task(context, title, status):
    task = Task.objects.create(title=title, status=status)
    context["task"] = task
The Update Action (The "When")
@when(
    parsers.parse(
        'I send a PATCH request to the task detail url with status "{status}"'
    )
)
def update_task_status(api_client, context, status):
    task = context["task"]
    url = f"/api/tasks/{task.id}/"
    response = api_client.patch(url, {"status": status})
    context["response"] = response
Verifying the Change (The "Then")
@then(parsers.parse('the task "{title}" should have status "{status}"'))
def check_task_status(title, status):
task = Task.objects.get(title=title)
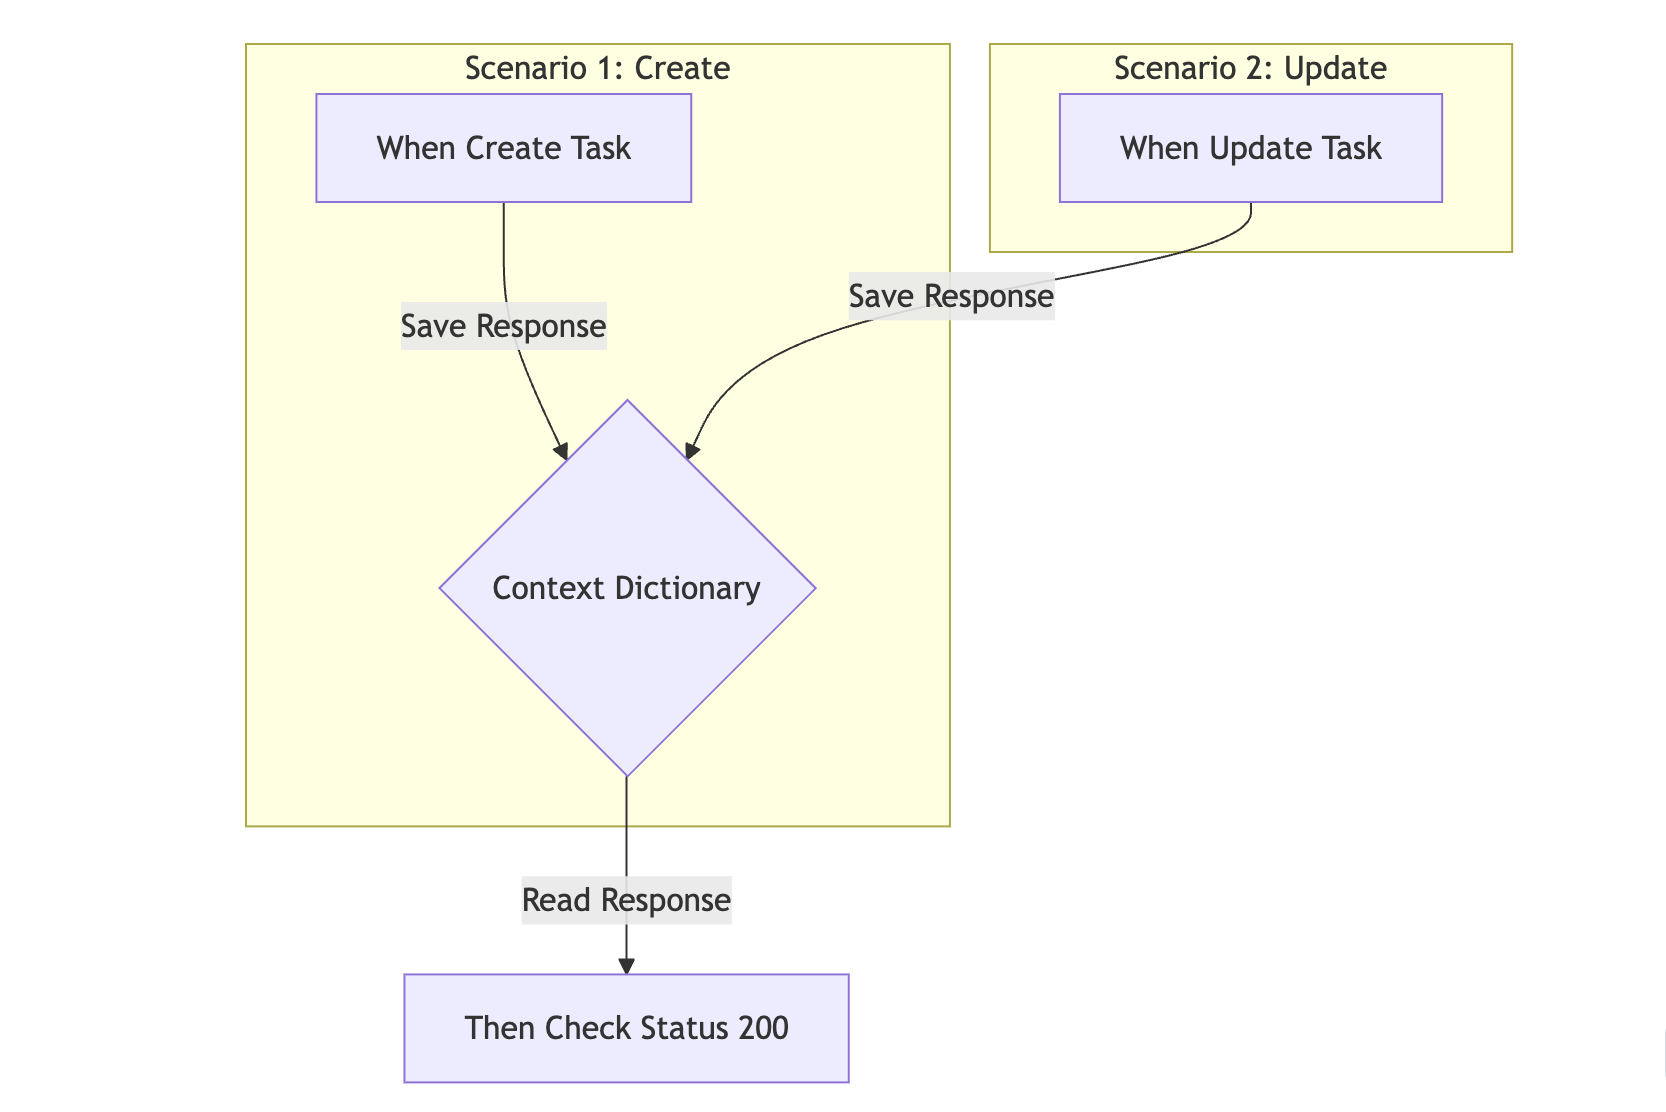
assert task.status == statusThe Power of Context (The Backpack)
What is context? (Full Explanation)
In Python, variables usually have a short life. If you define x = 5 inside a function, x ceases to exist when that function ends.
The BDD Problem: BDD splits a single test scenario into 3 separate Python functions.
- Function 1 (create_task): Makes an API call and gets a response.
- Function 2 (check_status_code): Needs to check that response.
- But Function 1 is already finished! The response variable is dead!
The Solution: The Context Backpack The context fixture acts as a long-living backpack that survives across all steps in a scenario.
- Creation: Pytest creates one fresh backpack {} for every single Scenario.
- Sharing: Pytest passes this same backpack to every step function.
- Destruction: Once the Scenario ends, the backpack is destroyed.
This allows completely separate functions to "talk" to each other by leaving notes in the backpack.
This is the power of BDD. You build a library of reusable steps (like "Check Status Code") that you can mix and match to create hundreds of tests with very little code.
Part 4: The Moment of Truth - Running Your BDD Suite
You've set up the environment, defined your features, and mapped them to Python code. Now, it's time to see those green checkmarks.
Running the Suite
Since we're using uv, running tests is a breeze.
To run everything (standard unit tests + BDD scenarios):
uv run pytestTo run only your BDD features:
uv run pytest tasks/tests/test_bdd_tasks.pyDeciphering the Output
When you run the command, you'll see something like this:
tasks/tests/test_api.py ....                                             [ 66%]
tasks/tests/test_bdd_tasks.py ..                                         [100%]

============================== 6 passed in 0.33s ===============================
Reading the Terminal Output (The Matrix)
What am I looking at? Pytest prints a series of characters to show progress.
The Code:
- . (Dot): A test Passed. This is what you want!
- F (F): A test Failed.
- E (E): An Error occurred (like a crash).
Example Breakdown:
tasks/tests/test_bdd_tasks.py .... [100%]- We see 4 dots.
- This means 4 scenarios passed successfully.
- Scenario Outline: Buy Groceries (Row 1)
- Scenario Outline: Pay Bills (Row 2)
- Scenario Outline: Walk the Dog (Row 3)
- Scenario: Mark task as complete
If you see an F instead of a dot, Pytest will print a detailed report at the bottom.
What if it fails?
This is where pytest shines. If you make a mistake say, you look for status code 200 but the server returns 400 pytest will show you exactly what happened.
For example:
E       assert 400 == 200
E       +  where 400 = <Response [400]>.status_code
Breaking it down:
- E: Represents an Error line.
- assert 400 == 200: It clearly shows the mismatch. "I got 400, but you wanted 200".
- where 400 = ...: It shows you exactly which variable held the wrong value.
This verbose output saves you hours of debugging. You don't have to guess; the tool tells you "The status code from the response was 400."
Conclusion: You are now a BDD Pro
Congratulations! You've successfully implemented a Behavior-Driven Development loop in Django.
Recap of your new superpowers:
- Documentation that lives: Your feature files (.feature) are requirements that actually execute. You can't lie in documentation anymore!
- Shared Language: You can show manage_tasks.feature to a Product Manager, and they'll understand it perfectly.
- Reusable Code: You built a library of steps (like checking status codes) that speeds up future development.
What's Next?
Don't stop here. Try these challenges to level up:
- Delete Feature: Reuse the "Given a task exists" setup step and create a new "When I delete..." action.
- Validation: Write a scenario where creating a task without a title fails (Status 400).
- Filtering: Create 3 tasks (1 completed, 2 pending) and verify that filtering by status works.
Repo Link: https://github.com/abdullafajal/to_do
Happy testing!
Comments (0)
Sign in or create an account to join the conversation.
No comments yet. Be the first!