
Django is a powerful web framework for building web applications quickly and efficiently. It includes many built-in views that can be used to handle common tasks such as displaying a list of objects, creating new objects, and editing existing objects. In this answer, I will cover 10 Django built-in views that you should know for your next project, along with proper explanations and examples.
ListView
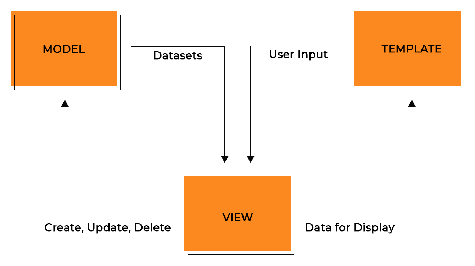
ListView The ListView is a built-in view that displays a list of objects from a model. It is commonly used to display a list of blog posts, products, or other types of content. Here's an example:
from django.views.generic import ListView
from .models import Post

class PostListView(ListView):
    model = Post
    template_name = 'blog/post_list.html'
    context_object_name = 'posts'
    ordering = ['-date_posted']
In this example, the ListView is used to display a list of blog posts from the Post model. The template_name attribute specifies the template to use for rendering the view, and the context_object_name attribute specifies the name of the context variable that will contain the list of objects.
DetailView
DetailView The DetailView is a built-in view that displays the details of a single object from a model. It is commonly used to display a blog post, product details, or other types of content. Here's an example:
from django.views.generic import DetailView
from .models import Post

class PostDetailView(DetailView):
    model = Post
    template_name = 'blog/post_detail.html'
    context_object_name = 'post'
In this example, DetailView is used to display the details of a single blog post from the Post model. The template_name attribute specifies the template to use for rendering the view, and the context_object_name attribute specifies the name of the context variable that will contain the object.
CreateView
CreateView The CreateView is a built-in view that displays a form to create a new object from a model. It is commonly used to create new blog posts, products, or other types of content. Here's an example:
from django.views.generic import CreateView
from .models import Post
from .forms import PostForm

class PostCreateView(CreateView):
    model = Post
    form_class = PostForm
    template_name = 'blog/post_form.html'
In this example, the CreateView is used to display a form to create a new blog post from the Post model. The form_class attribute specifies the form to use for rendering the form, and the template_name attribute specifies the template to use for rendering the view.
UpdateView
UpdateView The UpdateView is a built-in view that displays a form to edit an existing object from a model. It is commonly used to edit blog posts, products, or other types of content. Here's an example:
from django.views.generic import UpdateView
from .models import Post
from .forms import PostForm

class PostUpdateView(UpdateView):
    model = Post
    form_class = PostForm
    template_name = 'blog/post_form.html'
In this example, the UpdateView is used to display a form to edit an existing blog post from the Post model. The form_class attribute specifies the form to use for rendering the form, and the template_name attribute specifies the template to use for rendering the view.
DeleteView
DeleteView The DeleteView is a built-in view that displays a confirmation page before deleting an object from a model. It is commonly used to delete blog posts, products, or other types of content. Here's an example:
from django.views.generic import DeleteView
from .models import Post
from django.urls import reverse_lazy

class PostDeleteView(DeleteView):
    model = Post
    template_name = 'blog/post_confirm_delete.html'
    success_url = reverse_lazy('blog-home')
In this example, the DeleteView is used to display a confirmation page before deleting a blog post from the Post model. The template_name attribute specifies the template to use for rendering the view, and the success_url attribute specifies the URL to redirect to after the object is deleted.
FormView
FormView The FormView is a built-in view that displays a form and processes user input. It can be used to implement custom forms or handle form submissions. Here's an example:
from django.views.generic import FormView
from .forms import ContactForm
from django.urls import reverse_lazy

class ContactView(FormView):
    form_class = ContactForm
    template_name = 'contact.html'
    success_url = reverse_lazy('contact-success')

    def form_valid(self, form):
        form.send_email()
        return super().form_valid(form)
In this example, the FormView is used to display a contact form and send an email when the form is submitted. The form_class attribute specifies the form to use for rendering the form, and the template_name attribute specifies the template to use for rendering the view. The success_url attribute specifies the URL to redirect to after the form is successfully submitted. The form_valid() method is overridden to send the email when the form is submitted.
RedirectView
RedirectView The RedirectView is a built-in view that redirects to a specified URL. It can be used to implement custom redirects or handle redirects from other views. Here's an example:
from django.views.generic import RedirectView
from django.urls import reverse_lazy

class AboutRedirectView(RedirectView):
    url = reverse_lazy('about')
In this example, the RedirectView is used to redirect to the about page. The url attribute specifies the URL to redirect to.
TemplateView
TemplateView The TemplateView is a built-in view that displays a template. It can be used to implement custom pages or handle static pages. Here's an example:
from django.views.generic import TemplateView

class AboutView(TemplateView):
    template_name = 'about.html'
In this example, the TemplateView is used to display the about page. The template_name attribute specifies the template to use for rendering the view.
ArchiveIndexView
ArchiveIndexView The ArchiveIndexView is a built-in view that displays a list of objects from a model grouped by date. It is commonly used to display a list of blog posts grouped by month or year. Here's an example:
from django.views.generic import ArchiveIndexView
from .models import Post

class PostArchiveIndexView(ArchiveIndexView):
    model = Post
    date_field = 'date_posted'
    template_name = 'blog/post_archive.html'
In this example, the ArchiveIndexView is used to display a list of blog posts grouped by month and year based on the date_posted field of the Post model. The template_name attribute specifies the template to use for rendering the view.
MonthArchiveView
MonthArchiveView The MonthArchiveView is a built-in view that displays a list of objects from a model for a specific month and year. It is commonly used to display a list of blog posts for a specific month and year. Here's an example:
from django.views.generic import MonthArchiveView
from .models import Post

class PostMonthArchiveView(MonthArchiveView)
    model = Post
    date_field = 'date_posted'
    month_format = '%m'
    template_name = 'blog/post_archive_month.html'
In this example, the MonthArchiveView is used to display a list of blog posts for a specific month and year based on the date_posted field of the Post model. The date_field attribute specifies the date field to use for filtering the objects. The month_format attribute specifies the format to use for parsing the month from the URL. The template_name attribute specifies the template to use for rendering the view.
Conclusion
In this article, we covered 10 Django built-in views that can be used to implement common functionality in your web application. Each view provides a different set of features and functionality, allowing you to build custom pages and handle common tasks easily. By using these views, you can save time and focus on building your application logic instead of re-implementing common functionality.