
Welcome to Espere
In this article, we will tell you how to create a news website with the help of Django. You can also write your article on Espere like this and chat with your friends, you can follow me this is my profile, without wasting your time let's start.
Here is a general outline of how you could build a news app using Django and Python:
- Start by creating a new Django project using the command "
django-admin startproject projectname" - Create a new app within your project using the command "
python manage.py startapp appname" - Define your models in the app's models.py file to represent the news articles, including fields such as the title, author, and body text.
- Use Django's built-in admin interface to add and manage news articles easily.
- Create views in the app's views.py file to handle requests and render templates displaying the news articles.
- Define the URLs for your app in the project's urls.py file.
- Create templates in the app's templates folder to define the HTML structure of the pages displaying the news articles.
- Use Django's built-in authentication system to secure the admin interface and restrict access to authorized users.
- Use Django's built-in pagination to display a limited number of articles per page.
- Finally, you can also use Django's built-in caching to improve the app's performance.
Please note that this is a high-level overview and there are many other details and considerations that you will need to take into account when building a news app using Django.
Here's an example of what some of the code for a basic news app in Django might look like:
you have to create a project:
django-admin startproject news
Create an app too:
python manage.py startapp article
Register your app in settings.py:
INSTALLED_APPS = [
    "django.contrib.admin",
    "django.contrib.auth",
    "django.contrib.contenttypes",
    "django.contrib.sessions",
    "django.contrib.messages",
    "django.contrib.staticfiles",
    "article", # new
]
You have to create models in models.py:
from django.db import models

# Create your models here.

class NewsArticle(models.Model):
    title = models.CharField(max_length=255)
    author = models.CharField(max_length=255)
    body = models.TextField()
    pub_date = models.DateTimeField(auto_now_add=True)

    def __str__(self):
        return self.title
You have to add your models to admin.py so that you will be able to see your data in the admin panel and you will also add the blog from there.
from django.contrib import admin
from .models import NewsArticle


# Register your models here.

admin.site.register(NewsArticle)
You have to create a table in the database using this command:
python manage.py makemigrations
Then give migrate command:
python manage.py migrate
Now you have to create your views in views.py:
from django.shortcuts import render
from django.shortcuts import render
from .models import NewsArticle

# Create your views here.


def article_list(request):
    articles = NewsArticle.objects.all()
    return render(request, "news/article_list.html", {"articles": articles})


def article_detail(request, pk):
    article = NewsArticle.objects.get(pk=pk)
    return render(request, "news/article_detail.html", {"article": article})
You have to create URLs for views You have to create urls.py file in your app directory:
from django.urls import path
from .views import article_list, article_detail

urlpatterns = [
    path("", article_list, name="home"),
    path("articles/<int:pk>/", article_detail, name="article_detail"),
]
You have to include your app's URL in the project URL in your news/urls.py
"""news URL Configuration

The `urlpatterns` list routes URLs to views. For more information please see:
    https://docs.djangoproject.com/en/4.1/topics/http/urls/
Examples:
Function views
    1. Add an import:  from my_app import views
    2. Add a URL to urlpatterns:  path('', views.home, name='home')
Class-based views
    1. Add an import:  from other_app.views import Home
    2. Add a URL to urlpatterns:  path('', Home.as_view(), name='home')
Including another URLconf
    1. Import the include() function: from django.urls import include, path
    2. Add a URL to urlpatterns:  path('blog/', include('blog.urls'))
"""
from django.contrib import admin
from django.urls import path, include

urlpatterns = [
    path("admin/", admin.site.urls),
    path("", include("article.urls")),
]
Now you have to create templates to show the data.
Here's an example of what the template code for the article list and detail pages might look like:
article_list.html:
{% extends 'news/base.html' %}

{% block content %}
  <h1>News Articles</h1>
  <ul>
    {% for article in articles %}
      <li><a href="{% url 'article_detail' article.pk %}">{{ article.title }}</a></li>
      <p>{{ article.body | truncatewords:"35"|linebreaks }}</p>
    {% endfor %}
  </ul>
{% endblock %}
article_detail.html:
{% extends 'news/base.html' %}

{% block content %}
  <h1>{{ article.title }}</h1>
  <p>by {{ article.author }}</p>
  <p>{{ article.body }}</p>
  <p>Published on {{ article.pub_date }}</p>
{% endblock %}
This is a very simple example, and in a real-world application, you would likely want to add more formatting and styling to make the pages look more professional. Additionally, these templates use some basic Django template tags such as {% for %}, {% extends %}, {% block %}, {% url %}, {{ }} and {% endfor %}, {% endblock %} which you should be familiar with when working with Django templates.
base.html:
<!DOCTYPE html>
<html>
<head>
    {% load static %}
  <title>My News App</title>
  <link rel="stylesheet" type="text/css" href="{% static 'css/base.css' %}">
</head>
<body>
  <header>
    <nav>
      <a href="{% url 'home' %}">Home</a>
      <a href="#">About</a>
      <a href="#">Contact</a>
    </nav>
  </header>
  <main>
    {% block content %}{% endblock %}
  </main>
  <footer>
    <p>Copyright © {{ current_year }} My News App</p>
  </footer>
</body>
</html>
This is a very basic example of a base template that includes a header, navigation menu, and footer. You could add more elements like a logo, banner, search bar, and many other things. The {% block %} template tag is used to define a block that can be overridden by child templates, in this case, the {% block content %} block is where the content of the child templates will be rendered. The {% static %} template tag is used to include static files like stylesheets and images in the template.
You should also note that the current_year is a variable that is passed to the template context by the views.py file. and you can also use {% url 'name' %} for linking URLs.
You have to create a folder named static in your app directory to add CSS.
static/css/base.css:
body {
    font-family: Arial, sans-serif;
    margin: 0;
    padding: 0;
  }

  header {
    background-color: #f1f1f1;
    padding: 1em;
  }

  nav a {
    color: #000;
    text-decoration: none;
    margin-right: 1em;
  }

  main {
    padding: 1em;
  }

  footer {
    background-color: #f1f1f1;
    padding: 1em;
    text-align: center;
  }
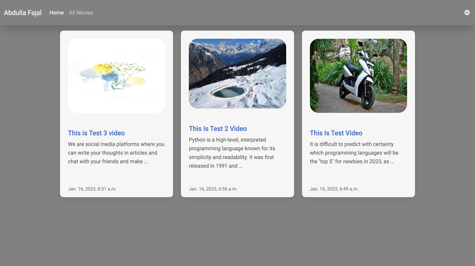
Now your news web is ready. You need to login as admin to add news. For that, you have to create a superuser using this command:
python manage.py createsuperuser
You see the screenshot


If you have any problem then you can comment and you can also check out our Django course