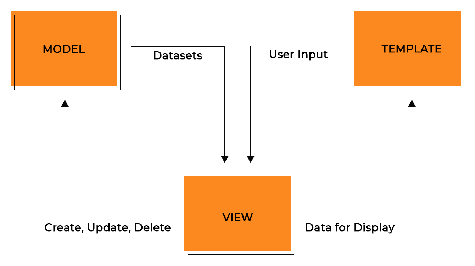
Django is a high-level Python web framework that enables rapid development and clean, pragmatic design. With Django, you can take web development to the next level and create robust, secure, and user-friendly websites with ease. In this guide, we will walk you through the steps of building a mini blog website with Django from start to finish.
Prerequisites
Before diving into the development process, you need to have a basic understanding of Python and some experience with web development. Additionally, it is recommended to have a development environment set up, including Python, pip, and a text editor or IDE.
Step 1: Install Django
The first step in building a website with Django is to install the framework. You can do this by using the pip package manager with the following command:
pip install Django
Step 2: Create a Django Project
Once you have installed Django, you can create a new project by using the following command:
django-admin startproject miniblog
This will create a new directory called miniblog that contains the basic structure of your Django project.
Step 3: Create a Django App
A Django project can consist of multiple apps, each of which can handle a specific functionality of the website. To create a new app, navigate to the project directory and run the following command:
python manage.py startapp blog
This will create a new directory with the same name as your app, containing all the necessary files to run a Django app.
Step 4: Add your app to the project's settings
Your project directory will have a settings.py file, open it and mention the app like this:
# Application definition

INSTALLED_APPS = [
    "django.contrib.admin",
    "django.contrib.auth",
    "django.contrib.contenttypes",
    "django.contrib.sessions",
    "django.contrib.messages",
    "django.contrib.staticfiles",
    "blog",  # new
]
This will install this app in your project
Step 5: Define Models
Models are the backbone of a Django website, representing the data that will be stored in the database. To define models, open the "models.py" file in your app directory and add the following code:
from django.db import models
from django.contrib.auth.models import User

# Create your models here.


class Post(models.Model):
    user = models.ForeignKey(User, on_delete=models.CASCADE, related_name="posts")
    title = models.CharField(max_length=200)
    body = models.TextField()
    pub_date = models.DateTimeField(auto_now_add=True)

    def __str__(self):
        return self.title
I will take Django's default UserCreationForm form to sign up the user, signup the user from it and use the AuthenticationForm form for login.
Step 6: Define Forms
In much the same way that a Django model describes the logical structure of an object, its behaviour, and the way its parts are represented to us, a Form class describes a form and determines how it works and appears. As I told you above, Django gives us some default forms, I will take help with that, if you want, you can also use a custom form.
For this, you have to create a file named forms.py inside your app and define your forms inside it.
from django import forms
from django.contrib.auth.forms import (
    UserCreationForm,
    AuthenticationForm,
    UsernameField,
)
from django.contrib.auth.models import User
from django.utils.translation import gettext, gettext_lazy as _
from .models import Post


# Default user creation form
class SignUpForm(UserCreationForm):
    password1 = forms.CharField(
        label="Password", widget=forms.PasswordInput(attrs={"class": "form-control"})
    )
    password2 = forms.CharField(
        label="Confirm Password (again)",
        widget=forms.PasswordInput(attrs={"class": "form-control"}),
    )

    class Meta:
        model = User
        fields = ["username", "first_name", "last_name", "email"]
        labels = {
            "first_name": "First Name",
            "last_name": "Last Name",
            "email": "Email",
        }
        widgets = {
            "username": forms.TextInput(attrs={"class": "form-control"}),
            "first_name": forms.TextInput(attrs={"class": "form-control"}),
            "last_name": forms.TextInput(attrs={"class": "form-control"}),
            "email": forms.EmailInput(attrs={"class": "form-control"}),
        }


# Default authentication form
class LoginForm(AuthenticationForm):
    username = UsernameField(
        widget=forms.TextInput(attrs={"autofocus": True, "class": "form-control"})
    )
    password = forms.CharField(
        label=_("Password"),
        strip=False,
        widget=forms.PasswordInput(
            attrs={"autocomplete": "current-password", "class": "form-control"}
        ),
    )


# my post creation form
class PostForm(forms.ModelForm):
    class Meta:
        model = Post
        fields = ["title", "body"]
        labels = {"title": "Title", "body": "Description"}
        widgets = {
            "title": forms.TextInput(attrs={"class": "form-control"}),
            "body": forms.Textarea(attrs={"class": "form-control"}),
        }
- I have used
SignUpFormto signup the user, I have inherited it fromUserCreationForm - I have used
LoginFormto log in the user, I have inherited it fromAuthenticationForm PostForm, I have made this it's called modelform, with the help of which users will upload their posts.
Step 7: Migrate the Database
Once you have defined your models, you need to create the database tables to store the data. You can do this by running the following command:
python manage.py makemigrations
python manage.py migrate
Step 8: Create Views
Views handle the logic of the website and render the template, which is the HTML file that displays the content to the user. To create views, open the "views.py" file in your app directory and add the following code:
from django.shortcuts import render, HttpResponseRedirect, get_object_or_404
from .forms import SignUpForm, LoginForm, PostForm
from django.contrib import messages
from django.contrib.auth import authenticate, login, logout
from .models import Post
from django.core.exceptions import ValidationError

# Home
def home(request):
    posts = Post.objects.all().order_by("-id")
    return render(request, "blog/home.html", {"posts": posts})


# Read full blog
def read(request, id):
    post = get_object_or_404(Post, pk=id)
    return render(request, "blog/read.html", {"post": post})


# About
def about(request):
    return render(request, "blog/about.html")


# Contact
def contact(request):
    return render(request, "blog/contact.html")


# Dashboard
def dashboard(request):
    if request.user.is_authenticated:
        user = request.user
        posts = Post.objects.filter(user=user).order_by("-id")
        full_name = user.get_full_name()
        return render(
            request,
            "blog/dashboard.html",
            {"posts": posts, "full_name": full_name},
        )
    else:
        return HttpResponseRedirect("/login/")


# Logout
def user_logout(request):
    logout(request)
    return HttpResponseRedirect("/")


# Sigup
def user_signup(request):
    if request.method == "POST":
        form = SignUpForm(request.POST)
        if form.is_valid():
            form.save()
            messages.success(request, "Congratulations!! You have become an Author.")
    else:
        form = SignUpForm()
    return render(request, "blog/signup.html", {"form": form})


# Login
def user_login(request):
    if not request.user.is_authenticated:
        if request.method == "POST":
            form = LoginForm(request=request, data=request.POST)
            if form.is_valid():
                uname = form.cleaned_data["username"]
                upass = form.cleaned_data["password"]
                user = authenticate(username=uname, password=upass)
                if user is not None:
                    login(request, user)
                    messages.success(request, "Logged in Successfully !!")
                    return HttpResponseRedirect("/dashboard/")
        else:
            form = LoginForm()
        return render(request, "blog/login.html", {"form": form})
    else:
        return HttpResponseRedirect("/dashboard/")


# Add New Post
def add_post(request):
    if request.user.is_authenticated:
        if request.method == "POST":
            form = PostForm(request.POST)
            if form.is_valid():
                obj = form.save(commit=False)
                obj.user = request.user
                obj.save()
                messages.success(request, "Blog Upload Successfully")
                return HttpResponseRedirect("/dashboard/")
        else:
            form = PostForm()
        return render(request, "blog/addpost.html", {"form": form})
    else:
        return HttpResponseRedirect("/login/")


# Update/Edit Post
def update_post(request, id):
    if request.user.is_authenticated:
        if request.method == "POST":
            pi = Post.objects.get(pk=id)
            form = PostForm(request.POST, instance=pi)
            if form.is_valid():
                form.save()
                messages.success(request, "Blog Updated Successfully")
                return HttpResponseRedirect("/dashboard/")
        else:
            pi = Post.objects.get(pk=id)
            form = PostForm(instance=pi)
        return render(request, "blog/updatepost.html", {"form": form})
    else:
        return HttpResponseRedirect("/login/")


# Delete Post
def delete_post(request, id):
    if request.user.is_authenticated:
        user = request.user
        if request.method == "POST":
            pi = Post.objects.get(pk=id)
            if user == pi.user:
                pi.delete()
            else:
                raise ValidationError("You do not have permission to delete")
            return HttpResponseRedirect("/dashboard/")
    else:
        return HttpResponseRedirect("/login/")
home, this is for my home page, all these articles will be there, and after clicking on them you will be able to read the complete article.-
read,this is for the user will be able to read the complete article -
about,this is for the about page. -
contact,this is for the contact page, I'll put my form on it but it won't work it will be a bootstrap form only. -
dashboard,this will be the dashboard of the user from where the user will be able to upload his blogs and will also be able to edit and delete them. -
user_logout,this is to log out of the user. -
user_signup,this is for registering the user. -
user_login,this is for login the user. -
add_post,this is for adding the post, here the user will get the form, and he can write the post on it. You can also use CKEditor for textarea. -
update_post,this is for editing/updating the post. -
delete_post,this is for deleting the post.
Step 9: Create Templates
Templates are the HTML files that define the structure and content of the web pages. To create templates, create a new directory called "templates" and the blog inside your app directory and add the following HTML file.
First of all, I will create a base template in which my static files will also be loaded, and all templates will inherit the base template.
templates/blog
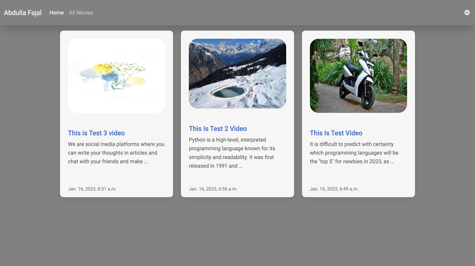
base.html<!DOCTYPE html> {% load static %} <html lang="en"> <head> <meta charset="UTF-8"> <meta name="viewport" content="width=device-width, initial-scale=1.0"> <link rel="stylesheet" href="{% static 'blog/css/bootstrap.css' %}"> <link rel="stylesheet" href="{% static 'blog/css/style.css' %}"> <title>Document</title> </head> <body> <div class="container-fluid bg-dark"> {% include 'blog/navbar.html' %} </div> <div class="container"> <div class="row"> <div class="col-sm-12"> {% block msg %} {% endblock msg %} </div> </div> <div class="row"> {% block side %} {% endblock side %} {% block content %} {% endblock content %} </div> </div> <script src="{% static 'blog/js/jquery.js' %}"></script> <script src="{% static 'blog/js/popper.js' %}"></script> <script src="{% static 'blog/js/bootstrap.js' %}"></script> </body> </html>navbar.html<nav class="navbar navbar-expand-lg navbar-dark bg-dark"> <a class="navbar-brand" href="#">Mini Blog</a> <button class="navbar-toggler" type="button" data-toggle="collapse" data-target="#navbarNav" aria-controls="navbarNav" aria-expanded="false" aria-label="Toggle navigation"> <span class="navbar-toggler-icon"></span> </button> <div class="collapse navbar-collapse" id="navbarNav"> <ul class="navbar-nav"> <li class="nav-item active"> <a class="nav-link" href="/">Home <span class="sr-only">(current)</span></a> </li> <li class="nav-item"> <a class="nav-link" href="{% url 'about' %}">About</a> </li> <li class="nav-item"> <a class="nav-link" href="{% url 'contact' %}">Contact</a> </li> {% if request.user.is_authenticated %} <li class="nav-item"> <a class="nav-link" href="{% url 'dashboard' %}">Dashboard</a> </li> <li class="nav-item"> <a class="nav-link" href="{% url 'logout' %}">Logout</a> </li> {% else %} <li class="nav-item"> <a class="nav-link" href="{% url 'signup' %}">Signup</a> </li> <li class="nav-item"> <a class="nav-link" href="{% url 'login' %}">Login</a> </li> {% endif %} </ul> </div> </nav>home.html{% extends 'blog/base.html' %} {% load static %} {% block content %} <div class="col-sm-10"> <h3 class="text-white my-5">Home Page</h3> {% for post in posts %} <div class="jumbotron jumbotron-fluid jumbo-color"> <div class="container"> <a style="color: antiquewhite;" href="{% url 'read' post.id %}"> <h1 class="display-4 font-weight-bold">{{post.title}}</h1> </a> <p class="lead">{{post.body | truncatewords:"35"|linebreaks}}</p><br> <small>{{post.pub_date}}</small> </div> </div> {% endfor %} </div> {% endblock content %}The code above uses Django template language to loop through the data from the database and display it on the page.
read.html{% extends 'blog/base.html' %} {% load static %} {% block content %} <div class="col-sm-10"> <h3 class="text-white my-5">Read</h3> <div class="jumbotron jumbotron-fluid jumbo-color"> <div class="container"> <h1 class="display-4 font-weight-bold">{{post.title}}</h1> <p class="lead">{{post.body}}</p><br> <small>{{post.pub_date}}</small> </div> </div> </div> {% endblock content %}about.html{% extends 'blog/base.html' %} {% load static %} {% block content %} <div class="col-sm-10"> <h3 class="text-white my-5">About Page</h3> <p>Lorem ipsum dolor sit amet consectetur adipisicing elit. Tempore officiis repellat illo eos magnam dignissimos, obcaecati, perspiciatis repellendus distinctio, dolorum voluptas sequi eligendi. Adipisci iure illo ipsam ullam illum facere.</p> <p>Lorem ipsum dolor sit, amet consectetur adipisicing elit. Magnam magni reprehenderit nesciunt ipsa voluptas cumque voluptate earum? Commodi neque animi odio voluptatibus recusandae delectus dolor. Excepturi obcaecati ea unde ab architecto dolor facilis eligendi, porro perspiciatis laboriosam natus consectetur tenetur nam fugit, quibusdam labore nemo? Dolorum magni tenetur rem voluptate?</p> </div> {% endblock content %}contact.html{% extends 'blog/base.html' %} {% load static %} {% block content %} <div class="col-sm-10"> <h3 class="text-white mt-5">Contact Page</h3> <form> <div class="form-row"> <div class="form-group col-md-6"> <label for="inputName">Name</label> <input type="text" class="form-control" id="inputName"> </div> <div class="form-group col-md-6"> <label for="inputEmail">Email</label> <input type="email" class="form-control" id="inputEmail"> </div> </div> <div class="form-group"> <label for="inputAddress">Address</label> <input type="text" class="form-control" id="inputAddress"> </div> <div class="form-group"> <label for="message">Message</label> <textarea class="form-control" id="message" rows="3"></textarea> </div> <button type="submit" class="btn btn-primary">Send</button> </form> </div> {% endblock content %}-
dashboard.html{% extends 'blog/base.html' %} {% load static %} {% block msg %} {% if messages %} {% for message in messages %} <div {% if message.tags %} class="alert alert-{{message.tags}} alert-dismissible fade show" {% endif %}> <strong>{{message}}</strong> <button type="button" class="close" data-dismiss="alert" aria-label="Close"> <span aria-hidden="true">×</span> </button> </div> {% endfor %} {% endif %} {% endblock msg %} {% block side %} <div class="col-sm-2 text-white my-5 text-center"> <h4 class="my-5">Profile</h4> <h5>{{full_name}}</h5> {% for group in groups %} <p>{{group.name}}</p> {% endfor %} </div> {% endblock side %} {% block content %} <div class="col-sm-10"> <h3 class="text-white my-5">Dashboard Page</h3> <a href="{% url 'addpost' %}" class="btn btn-success">Add Post</a> <h4 class="text-center alert alert-info mt-3">Show Post Information</h4> {% if posts %} <table class="table table-hover bg-white"> <thead> <tr class="text-center"> <th scope="col" style="width:2%">ID</th> <th scope="col" style="width:28%">Title</th> <th scope="col" style="width:55%">Description</th> <th scope="col" style="width:15%">Action</th> </tr> </thead> <tbody> {% for post in posts %} <tr> <th scope="row">{{post.id}}</th> <td>{{post.title}}</td> <td>{{post.body | truncatewords:"35"|linebreaks}}</td> <td class="text-center"> <a href="{% url 'updatepost' post.id %}" class="btn btn-warning btn-sm">Edit</a> <form action="{% url 'deletepost' post.id %}" method="post" class="d-inline"> {% csrf_token %} <input type="submit" class="btn btn-danger btn-sm" value="Delete"> </form> </td> </tr> {% endfor %} </tbody> </table> {% else %} <h4 class="text-center alert alert-warning">No Records</h4> {% endif %} </div> {% endblock content %} -
signup.html{% extends 'blog/base.html' %} {% load static %} {% block content %} <div class="col-sm-10"> <h3 class="text-white my-5">Become an Author</h3> {% if messages %} {% for message in messages %} <p {% if message.tags %} class="alert alert-{{message.tags}} mb-5" {% endif %}>{{message}}}</p> {% endfor %} {% endif %} <form action="" method="post" novalidate> {% csrf_token %} {% for fm in form %} <div class="form-group"> {{fm.label_tag}} {{fm}} <small class="text-warning">{{fm.errors|striptags}}</small> </div> {% endfor %} <input type="submit" value="Submit" class="btn btn-primary"> {% if form.non_field_errors %} {% for error in form.non_field_errors %} <p class="alert alert-danger my-3">{{error}}</p> {% endfor %} {% endif %} </form> </div> {% endblock content %} -
login.html{% extends 'blog/base.html' %} {% load static %} {% block content %} <div class="col-sm-10"> <h3 class="text-white my-5">Login Page</h3> <form action="" method="post" novalidate> {% csrf_token %} {% for fm in form %} <div class="form-group"> {{fm.label_tag}} {{fm}} <small class="text-warning">{{fm.errors|striptags}}</small> </div> {% endfor %} <input type="submit" class="btn btn-primary" value="Login"> {% if form.non_field_errors %} {% for error in form.non_field_errors %} <p class="alert alert-danger my-3">{{error}}</p> {% endfor %} {% endif %} </form> </div> {% endblock content %} -
addpost.html{% extends 'blog/base.html' %} {% load static %} {% block content %} <div class="col-sm-10"> <h3 class="text-white my-5">Dashboard/ Add Post</h3> <form action="" method="post" novalidate> {% csrf_token %} {{form.as_p}} <input type="submit" value="Add" class="btn btn-success"> <a href="{% url 'dashboard' %}" class="btn btn-danger">Cancel</a> </form> </div> {% endblock content %} -
updatepost.html{% extends 'blog/base.html' %} {% load static %} {% block content %} <div class="col-sm-10"> <h3 class="text-white my-5">Dashboard/ Update Post</h3> <form action="" method="post" novalidate> {% csrf_token %} {{form.as_p}} <input type="submit" value="Update" class="btn btn-success"> <a href="{% url 'dashboard' %}" class="btn btn-danger">Cancel</a> </form> </div> {% endblock content %}
Step 10: Configure URLs
URLs define the mapping between the web address and the view that should be displayed. To configure URLs, open the "urls.py" file in your app directory and add the following code:
from django.urls import path
from . import views


urlpatterns = [
    path("", views.home),
    path("about/", views.about, name="about"),
    path("contact/", views.contact, name="contact"),
    path("dashboard/", views.dashboard, name="dashboard"),
    path("signup/", views.user_signup, name="signup"),
    path("login/", views.user_login, name="login"),
    path("logout/", views.user_logout, name="logout"),
    path("addpost/", views.add_post, name="addpost"),
    path("updatepost/<int:id>/", views.update_post, name="updatepost"),
    path("delete/<int:id>/", views.delete_post, name="deletepost"),
    path("read/<int:id>/", views.read, name="read"),
]
Step 11: Run the Development Server
Finally, you can run the development server by running the following command in your terminal:
python manage.py runserver
Once the server is running, you can visit "http://127.0.0.1:8000/" in your web browser to view your website. You can make changes to the code and the changes will be automatically reflected on the website when you refresh the page.
Note: I could not provide you with the code of static files, I have given the link to google drive, you can download and add it to your project.
Conclusion
Building a website with Django is a straightforward process once you understand the basics. By following this step-by-step guide, you should be able to build a simple website quickly and easily. As you become more familiar with Django and web development, you can add more features and functionality to your website. Remember to keep the code organized and well-commented, and to follow best practices for web development, such as security measures and performance optimization. With Django, the possibilities for building powerful, scalable websites are endless.
I hope you like it, If you have any issues, then tell me in the comment or you can also message me, this is my profile Abdulla Fajal. You can also check out our Django course.