
In today's article, we will tell you how to upload Movies/Videos and watch them online. For this, follow the steps we are telling you and if you want to learn Python and Django, then our courses are available, you can see them. Let us begin without wasting your time at all.
I think Django will be already installed in your system If not then you can install it like this:
pip install django
and you need a pillow for the media, you can install it with this command:
pip install Pillow
Now let's create our project:
django-admin startproject movie
A project named movie will be created, you can do cd movie and go inside it.
cd movie
You have to create an app, you can give any name to the project and app, we have given it the name of mediaplayer.
python manage.py startapp mediaplayer
Now you have to mention this app in your project setting in INSTALLED_APPS
INSTALLED_APPS = [
    "django.contrib.admin",
    "django.contrib.auth",
    "django.contrib.contenttypes",
    "django.contrib.sessions",
    "django.contrib.messages",
    "django.contrib.staticfiles",
    "mediaplayer", # new
]
You have to create a model for your project, for that, you will find a file named models.py inside your app and write inside it.
from django.db import models

# Create your models here.


class UploadMovie(models.Model):
    title = models.CharField(max_length=300)
    thumbnail = models.ImageField(upload_to="thumbnail", null=True, blank=True)
    description = models.CharField(max_length=500)
    slug = models.SlugField(unique=True, max_length=300)
    movie = models.FileField(upload_to="movies", null=True, blank=True)
    uploaded_at = models.DateTimeField(auto_now_add=True)

    class Meta:
        ordering = ["-uploaded_at"]

    def __str__(self):
        return self.title
You have to create your own forms for movie upload, for this, you have to go inside forms.py and write.
from django import forms

from .models import UploadMovie


class UploadMovieForm(forms.ModelForm):
    class Meta:
        model = UploadMovie
        fields = ["title", "thumbnail", "description", "movie"]
        widgets = {
            "title": forms.TextInput(attrs={"class": "form-control"}),
            "thumbnail": forms.FileInput(attrs={"class": "form-control"}),
            "description": forms.Textarea(attrs={"class": "form-control"}),
            "movie": forms.FileInput(attrs={"class": "form-control"}),
        }
Now our models and forms are created, now we go to our next step views where we will write the logic of our views in which we will show our form to frontend and in our UploadMovie models we will show the list of movies/videos on the home page and a view which makes it for our media player where we can watch that movie and video
from django.shortcuts import render, get_object_or_404
from django.template.defaultfilters import slugify
from django.contrib import messages
from django.http import HttpResponseRedirect
from django.core.paginator import Paginator, EmptyPage, PageNotAnInteger

from .models import UploadMovie
from .forms import UploadMovieForm

# Create your views here.


# this for list of all movies/videos
def home(request):
    queryset = UploadMovie.objects.all()
    page = request.GET.get("page", 1)
    paginator = Paginator(queryset, 12)

    try:
        movies = paginator.page(page)
    except PageNotAnInteger:
        movies = paginator.page(1)
    except EmptyPage:
        movies = paginator.page(paginator.num_pages)
    return render(request, "home.html", {"movies": movies})


# this for play a movie/video
def play_movie(request, slug):
    instance = get_object_or_404(UploadMovie, slug=slug)
    return render(request, "play_movie.html", {"instance": instance})


# this for upload a movie/video basically it's for form control
def add_movie(request):
    if request.method == "POST":
        fm = UploadMovieForm(request.POST, request.FILES)
        if fm.is_valid():
            obj = fm.save(commit=False)
            obj.slug = slugify(obj.title)
            obj.user = request.user
            obj.save()
            fm.save_m2m()
            messages.success(request, "Movie Uploaded Successfully")
            return HttpResponseRedirect("/")
    fm = UploadMovieForm()
    return render(request, "add_movie.html", {"form": fm})
We have to create the template mentioned in these views, and for that, we have to create a directory named templates inside our app, in that, we will write the code of the template.
home.html
<!DOCTYPE html>
<html lang="en">
<head>
    <meta charset="UTF-8">
    <meta http-equiv="X-UA-Compatible" content="IE=edge">
    <meta name="viewport" content="width=device-width, initial-scale=1.0">
    <title>
        {% block title %}
          Home Page
        {% endblock title %}
    </title>

    <!-- Font Awesome -->
<link
href="https://cdnjs.cloudflare.com/ajax/libs/font-awesome/6.0.0/css/all.min.css"
rel="stylesheet"
/>
<!-- Google Fonts -->
<link
href="https://fonts.googleapis.com/css?family=Roboto:300,400,500,700&display=swap"
rel="stylesheet"
/>
<!-- MDB -->
<link
href="https://cdnjs.cloudflare.com/ajax/libs/mdb-ui-kit/6.0.1/mdb.min.css"
rel="stylesheet"
/>

</head>
<body style="background-color: rgb(129, 129, 129);">
<!-- Navbar -->
<nav class="navbar navbar-expand-lg navbar-dark shadow-5-strong">
  <!-- Container wrapper -->
  <div class="container-fluid my-2">
    <!-- Navbar brand -->
    <a class="navbar-brand" href="{% url 'home' %}">Abdulla Fajal</a>

    <!-- Toggle button -->
    <button
      class="navbar-toggler"
      type="button"
      data-mdb-toggle="collapse"
      data-mdb-target="#navbarSupportedContent"
      aria-controls="navbarSupportedContent"
      aria-expanded="false"
      aria-label="Toggle navigation"
    >
      <i class="fas fa-bars"></i>
    </button>

    <!-- Collapsible wrapper -->
    <div class="collapse navbar-collapse" id="navbarSupportedContent">
      <!-- Left links -->
      <ul class="navbar-nav me-auto mb-2 mb-lg-0">
        <li class="nav-item">
          <a class="nav-link active" aria-current="page" href="{% url 'home' %}">Home</a>
        </li>
        <li class="nav-item">
          <a class="nav-link" href="{% url 'home' %}">All Movies</a>
        </li>
      </ul>
      <!-- Left links -->
    </div>
    <!-- Collapsible wrapper -->
  </div>
  <!-- Right elements -->
  <div class="align-items-center me-3 collapse navbar-collapse" id="navbarSupportedContent">
    <!-- Icon -->
    <a class="text-reset" data-mdb-toggle="tooltip" title="Add Movies" href="{% url 'add-movie' %}">
      <i style="color: rgb(224, 224, 224);" class="fas fa-plus-circle"></i>
    </a>
  </div>
  <!-- Right elements -->
  <!-- Container wrapper -->
</nav>
<!-- Navbar -->

{% block carousel %}

{% endblock carousel %}

{% block card %}

<section class="h-100 gradient-custom-2">
  <div class="container py-2 h-100">
    <div class="row d-flex justify-content-center align-items-center h-100">
      <div class="col col-lg-12 col-xl-10">
        <div class="row row-cols-1 row-cols-md-3 g-4">
          {% for movie in movies %}
          <div class="col">
            <a href="{% url 'play-movie' movie.slug %}">
                <div style="border-radius: 10px; background-color: rgb(246, 246, 246);" class="card h-100 mt-2">
                  <img style="height: 250px; width: 400; border-radius: 50px; border: 4px;" src="{{ movie.thumbnail.url }}" class="card-body" alt="Skyscrapers"/>
                  <div class="card-body">
                    <h5 class="card-title">{{movie.title}}</h5>
                    <p style="color: rgb(97, 97, 97);" class="card-text">
                      {{movie.description | truncatewords:"20"}}
                    </p>
                  </div>
                  <div class="card-footer">
                    <small class="text-muted">{{movie.uploaded_at}}</small>
                  </div>
                </div>
              </a>
            </div>
            {% endfor %}
          </div>
        </div>
      </div>
    </div>
  </section>

  {% endblock card %}
<!-- MDB -->
<script
  type="text/javascript"
  src="https://cdnjs.cloudflare.com/ajax/libs/mdb-ui-kit/6.0.1/mdb.min.js"
></script>
</body>
</html>
play_movie.html
{% extends "home.html" %}
{% load static %}
{% block title %}
Add Movie
{% endblock title %}

{% block card %}
<div class="row">
    <div class="col-3"></div>
    <div class="col-6 mt-5">
    <video width="100%" controls>
        <source src="{{instance.movie.url}}" type="video/mp4">
        <source src="{{instance.movie.url}}" type="video/ogg">
        Your browser does not support HTML video.
    </video>

    <h3 style="color: black;">{{instance.title}}</h3>
    <p style="color: black;">{{instance.description}}</p><br>
    <p style="color: black;" >Uploaded Date: {{instance.uploaded_at}}</p>
</div>
    <div class="col-3"></div>
</div>
{% endblock card %}
add_movie.html
{% extends "home.html" %}
{% load static %}
{% block title %}
Add Movie
{% endblock title %}

{% block carousel %}

{% endblock carousel %}

{% block card %}
<div class="row">
    <div class="col-4"></div>
    <div class="col-4">
        <form action="" method="post" enctype="multipart/form-data">
            {% csrf_token %}
            {{form.as_p}}
            <input class="btn btn-dark" type="submit" value="submit">
        </form>
    </div>
    <div class="col-4"></div>
</div>
{% endblock card %}
Now we will create URLs for these views For that, we have to create a file named urls.py inside our app.
from django.urls import path
from . import views

urlpatterns = [
    path("", views.home, name="home"),
    path("play-movie/<slug:slug>/", views.play_movie, name="play-movie"),
    path("add-movie/", views.add_movie, name="add-movie"),
]
We will include these URLs in our project URLs.
"""movie URL Configuration

The `urlpatterns` list routes URLs to views. For more information please see:
    https://docs.djangoproject.com/en/3.2/topics/http/urls/
Examples:
Function views
    1. Add an import:  from my_app import views
    2. Add a URL to urlpatterns:  path('', views.home, name='home')
Class-based views
    1. Add an import:  from other_app.views import Home
    2. Add a URL to urlpatterns:  path('', Home.as_view(), name='home')
Including another URLconf
    1. Import the include() function: from django.urls import include, path
    2. Add a URL to urlpatterns:  path('blog/', include('blog.urls'))
"""
from django.contrib import admin
from django.urls import path, include
from django.conf import settings
from django.conf.urls.static import static

urlpatterns = [
    path("admin/", admin.site.urls),
    path("", include("mediaplayer.urls")),
] + static(settings.MEDIA_URL, document_root=settings.MEDIA_ROOT)
You have to provide a media path and media URL otherwise you will not be able to access your media. You have to do the same as we have added the path of your media to your URLs in the above.
You also have to mention this in your project settings.py
MEDIA_URL = "/media/"
MEDIA_ROOT = os.path.join(BASE_DIR, "media/")
Your project is ready, you can host it on python any where also.
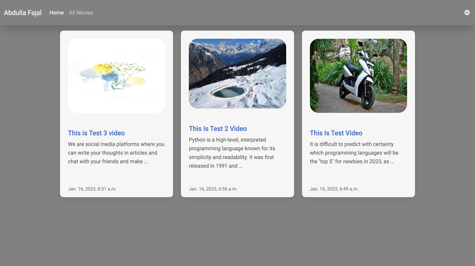
See the screenshot below.
Home Page

Add Movie/Video Page

Movie/Video Player Page

If you have any problem then you can comment or you can message me here is my profile