
Form validation is a crucial aspect of web development that ensures user-submitted data is accurate, complete, and in the expected format. We can enhance the user experience, improve data integrity, and prevent potential errors or security vulnerabilities by validating form inputs before processing them.
This article will explore how to implement form validation using HTML, CSS, and JavaScript. We'll cover the essential techniques and demonstrate practical examples you can apply to your web projects. Let's dive in!
HTML Structure:
To begin with, let's set up the HTML structure for our form. We'll create a simple form that collects user information, such as name, email, and password. Open your favourite text editor and create a new HTML file, then enter the following code:
<!DOCTYPE html>
<html lang="en">
<head>
<meta charset="UTF-8">
<meta http-equiv="X-UA-Compatible" content="IE=edge">
<meta name="viewport" content="width=device-width, initial-scale=1.0">
<!-- Fontawesome CDN Link For Icons -->
<link rel="stylesheet" href="https://cdnjs.cloudflare.com/ajax/libs/font-awesome/6.2.1/css/all.min.css" />
<link rel="stylesheet" href="style.css">
<title>Form Validation | Espere.in</title>
</head>
<body>
<form action="#">
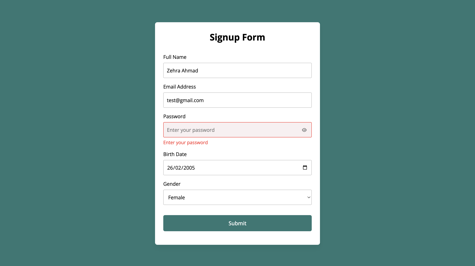
<h2>Signup Form</h2>
<div class="form-group fullname">
<label for="fullname">Full Name</label>
<input type="text" id="fullname" placeholder="Enter your full name">
</div>
<div class="form-group email">
<label for="email">Email Address</label>
<input type="text" id="email" placeholder="Enter your email address">
</div>
<div class="form-group password">
<label for="password">Password</label>
<input type="password" id="password" placeholder="Enter your password">
<i id="pass-toggle-btn" class="fa-solid fa-eye"></i>
</div>
<div class="form-group date">
<label for="date">Birth Date</label>
<input type="date" id="date" placeholder="Select your date">
</div>
<div class="form-group gender">
<label for="gender">Gender</label>
<select id="gender">
<option value="" selected disabled>Select your gender</option>
<option value="Male">Male</option>
<option value="Female">Female</option>
<option value="Other">Other</option>
</select>
</div>
<div class="form-group submit-btn">
<input type="submit" value="Submit">
</div>
</form>
<!-- JavaScript code -->
<script src="script.js"></script>
</body>
</html>
This section includes the HTML doctype declaration <!DOCTYPE html>. It also sets the language of the document to English using the lang attribute in the <html> tag.
In the <head> section, various meta tags are included for character encoding, compatibility, and viewport settings.
Additionally, there are two <link> tags. The first link is for the Font Awesome CDN (Content Delivery Network), which provides icons for the form. The second link is for an external CSS file named style.css.
Inside the <body> tag, there is a <form> element. The form has various form fields for users to input their information.
-
The
<h2>heading displays the title of the form as "Signup Form". -
Each form field is enclosed in a
<div>element with a specific class (form-group) for styling purposes. -
The form fields include:
-
Full Name: A text input field with the id "fullname" and a placeholder text "Enter your full name".
-
Email Address: A text input field with the id "email" and a placeholder text "Enter your email address".
-
Password: A password input field with the id "password" and a placeholder text "Enter your password". There is also an eye icon provided by Font Awesome (
fa-eye) to toggle password visibility. -
Birth Date: A date input field with the id "date" and a placeholder text "Select your date".
-
Gender: A select dropdown with the id "gender" and options for selecting the gender.
-
-
Finally, there is a submit button with the text "Submit".
At the end of the HTML file, there is a <script> tag that references an external JavaScript file named script.js. This is where you would write the JavaScript code to handle form validation and other functionality.
In the next part, we'll continue with the CSS styling and move on to implementing the JavaScript code for form validation.
Please let me know if you would like to continue with the rest of the article or if there's anything specific you'd like to learn about form validation.
CSS Styling:
Now that we have set up the HTML structure, let's proceed with styling the form using CSS. Open the styles.css file and add the following CSS code:
@import url('https://fonts.googleapis.com/css2?family=Open+Sans:wght@400;500;600;700&display=swap');

* {
  margin: 0;
  padding: 0;
  box-sizing: border-box;
  font-family: 'Open Sans', sans-serif;
}

body {
  display: flex;
  align-items: center;
  justify-content: center;
  padding: 0 10px;
  min-height: 100vh;
  background: #2C7873;
}

form {
  padding: 25px;
  background: #fff;
  max-width: 500px;
  width: 100%;
  border-radius: 7px;
  box-shadow: 0 10px 15px rgba(0, 0, 0, 0.05);
}

form h2 {
  font-size: 27px;
  text-align: center;
  margin: 0px 0 30px;
}

form .form-group {
  margin-bottom: 15px;
  position: relative;
}

form label {
  display: block;
  font-size: 15px;
  margin-bottom: 7px;
}

form input,
form select {
  height: 45px;
  padding: 10px;
  width: 100%;
  font-size: 15px;
  outline: none;
  background: #fff;
  border-radius: 3px;
  border: 1px solid #bfbfbf;
}

form input:focus,
form select:focus {
  border-color: #9a9a9a;
}

form input.error,
form select.error {
  border-color: #f91919;
  background: #f9f0f1;
}

form small {
  font-size: 14px;
  margin-top: 5px;
  display: block;
  color: #f91919;
}

form .password i {
  position: absolute;
  right: 0px;
  height: 45px;
  top: 28px;
  font-size: 13px;
  line-height: 45px;
  width: 45px;
  cursor: pointer;
  color: #939393;
  text-align: center;
}

.submit-btn {
  margin-top: 30px;
}

.submit-btn input {
  color: white;
  border: none;
  height: auto;
  font-size: 16px;
  padding: 13px 0;
  border-radius: 5px;
  cursor: pointer;
  font-weight: 500;
  text-align: center;
  background: #2C7873;
  transition: 0.2s ease;
}

.submit-btn input:hover {
  background: #40ada6;
}
The CSS code begins with an @import statement that imports the 'Open Sans' font from Google Fonts. This font will be used for the entire document.
The * selector applies the following styles to all elements on the page:
-
margin: 0;andpadding: 0;set the margin and padding of all elements to zero, effectively removing any default spacing. -
box-sizing: border-box;ensures that the total width and height of an element includes the padding and border, rather than being added on top of it. This prevents the element from expanding beyond its intended size. -
font-family: 'Open Sans', sans-serif;sets the font family for all elements to 'Open Sans', a sans-serif font. If 'Open Sans' is not available, it falls back to the default sans-serif font.
The body selector applies styles to the <body> element:
-
display: flex;creates a flex container, allowing its child elements to be aligned and positioned using a flexbox. -
align-items: center;andjustify-content: center;center the content horizontally and vertically within the flex container. -
padding: 0 10px;sets a left and right padding of 10 pixels for the body content. -
min-height: 100vh;sets the minimum height of the body to 100% of the viewport height, ensuring that the content fills the screen. -
background: #2C7873;sets the background color of the body to a shade of green.
The form selector applies styles to the <form> element:
-
padding: 25px;adds padding around the form content. -
background: #fff;sets the background color of the form to white. -
max-width: 500px;sets the maximum width of the form to 500 pixels. -
width: 100%;ensures that the form takes up the full width of its container. -
border-radius: 7px;rounds the corners of the form, giving it a slightly curved appearance. -
box-shadow: 0 10px 15px rgba(0, 0, 0, 0.05);adds a subtle box shadow to the form, giving it a 3D effect.
The form h2 selector applies styles to the <h2> element within the form:
-
font-size: 27px;sets the font size of the heading to 27 pixels. -
text-align: center;centers the text horizontally within the heading. -
margin: 0px 0 30px;sets the margin of the heading, with no top margin, no left or right margin, and a bottom margin of 30 pixels.
The form .form-group selector applies styles to the <div> elements with the class "form-group" within the form:
-
margin-bottom: 15px;adds a margin at the bottom of each form group, creating vertical spacing between them. -
position: relative;sets the position of the form group as relative, allowing the absolute positioning of child elements within it.
The code snippet continues with more CSS styles for different form elements and classes, such as labels, inputs, error states, submit buttons etc.
With these CSS styles, our form will have a clean and visually appealing layout. Feel free to modify the styles to match your preferences or the overall design of your website.
JavaScript Validation:
Now, let's move on to implementing the JavaScript code for form validation. Create a new file named script.js in the same directory as your HTML file and add the following JavaScript code:
// Selecting form and input elements
const form = document.querySelector("form");
const passwordInput = document.getElementById("password");
const passToggleBtn = document.getElementById("pass-toggle-btn");

// Function to display error messages
const showError = (field, errorText) => {
    field.classList.add("error");
    const errorElement = document.createElement("small");
    errorElement.classList.add("error-text");
    errorElement.innerText = errorText;
    field.closest(".form-group").appendChild(errorElement);
}

// Function to handle form submission
const handleFormData = (e) => {
    e.preventDefault();

    // Retrieving input elements
    const fullnameInput = document.getElementById("fullname");
    const emailInput = document.getElementById("email");
    const dateInput = document.getElementById("date");
    const genderInput = document.getElementById("gender");

    // Getting trimmed values from input fields
    const fullname = fullnameInput.value.trim();
    const email = emailInput.value.trim();
    const password = passwordInput.value.trim();
    const date = dateInput.value;
    const gender = genderInput.value;

    // Regular expression pattern for email validation
    const emailPattern = /^[^ ]+@[^ ]+\.[a-z]{2,3}$/;

    // Clearing previous error messages
    document.querySelectorAll(".form-group .error").forEach(field => field.classList.remove("error"));
    document.querySelectorAll(".error-text").forEach(errorText => errorText.remove());

    // Performing validation checks
    if (fullname === "") {
        showError(fullnameInput, "Enter your full name");
    }
    if (!emailPattern.test(email)) {
        showError(emailInput, "Enter a valid email address");
    }
    if (password === "") {
        showError(passwordInput, "Enter your password");
    }
    if (date === "") {
        showError(dateInput, "Select your date of birth");
    }
    if (gender === "") {
        showError(genderInput, "Select your gender");
    }

    // Checking for any remaining errors before form submission
    const errorInputs = document.querySelectorAll(".form-group .error");
    if (errorInputs.length > 0) return;

    // Submitting the form
    form.submit();
}

// Toggling password visibility
passToggleBtn.addEventListener('click', () => {
    passToggleBtn.className = passwordInput.type === "password" ? "fa-solid fa-eye-slash" : "fa-solid fa-eye";
    passwordInput.type = passwordInput.type === "password" ? "text" : "password";
});

// Handling form submission event
form.addEventListener("submit", handleFormData);
The code starts by selecting the form element using document.querySelector("form") and assigns it to the form variable. It also selects the password input element with the id "password" and assigns it to the passwordInput variable. Similarly, it selects the password toggle button with the id "pass-toggle-btn" and assigns it to the passToggleBtn variable.
The showError function is defined to display error messages for form fields. It takes two parameters: field, which represents the input field element, and errorText, which represents the error message to be displayed. Inside the function, it adds the "error" class to the field element, creates a <small> element for the error message assigns it the "error-text" class, sets the error text as its content, and appends it to the closest ancestor element with the class "form-group".
The handleFormData function is responsible for handling the form submission event. It takes the event object as a parameter and prevents the default form submission behaviour using e.preventDefault().
Inside the function, it retrieves the input elements by their respective ids and assigns their values to variables after trimming any leading or trailing whitespace. It also defines an email pattern using a regular expression for email validation.
Next, it clears any previous error messages by removing the "error" class from all elements with the "form-group" class that have an "error" class and removes all elements with the "error-text" class.
Then, it performs validation checks on the form inputs. If any validation fails, the showError function is called with the corresponding input field and error message as arguments.
After performing all validation checks, it checks if there are any remaining error inputs. If there are, the function returns and the form submission is halted.
If there are no errors, the form is submitted using form.submit().
// Toggling password visibility
passToggleBtn.addEventListener('click', () => {
    passToggleBtn.className = passwordInput.type === "password" ? "fa-solid fa-eye-slash" : "fa-solid fa-eye";
    passwordInput.type = passwordInput.type === "password" ? "text" : "password";
});
This code adds an event listener to the password toggle button. When the button is clicked, it toggles the visibility of the password field. If the password input type is currently "password", it changes the button's class to "fa-solid fa-eye-slash" to display a crossed-eye icon, and changes the password input type to "text" to reveal the password. If the password input type is currently "text", it changes the button's class to "fa-solid fa-eye" to display an open-eye icon, and changes the password input type back to "password" to hide the password.
// Handling form submission event
form.addEventListener("submit", handleFormData);
This code adds an event listener to the form's "submit" event. When the form is submitted, it calls the handleFormData function to handle the form submission.
Overall, this JavaScript code sets up event listeners for form submission and password visibility toggling, performs form validation, displays error messages, and submits the form if there are no errors.

With the JavaScript code in place, our form is now equipped with basic validation checks. You can customize and expand the validation logic based on your specific requirements.
Conclusion:
In this article, we learned how to implement form validation using HTML, CSS, and JavaScript. We started by setting up the HTML structure and adding CSS styles to create an appealing form layout. Then, we implemented JavaScript code to handle form validation, checking for empty fields and validating the email format.
Form validation is an essential part of web development to ensure data integrity and enhance the user experience. By incorporating these techniques into your projects, you can create robust and user-friendly forms.
Feel free to experiment and expand upon the code examples provided to meet your specific needs. Happy coding!
I hope this article helps you in implementing form validation in HTML, CSS, and JavaScript. If you have any further questions, feel free to ask!