Django is a powerful and popular web framework for building web applications in Python. One of the key features of Django is its generic views, which provide pre-built views for common tasks, such as displaying a list of objects or a single object. Using these generic views can save you a lot of time and effort, as you don't have to write the views from scratch.
In this article, we'll explore how to use Django's generic views to build web applications faster.
What are Django Generic Views?
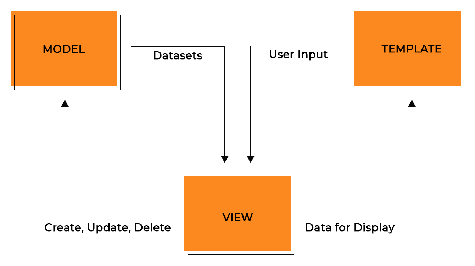
Django Generic Views are a set of pre-built views that provide common functionality for building web applications. They are called "generic" because they can be used with any model, and they provide a generic interface for working with model data. Generic views are built on top of Django's class-based views, which provide a powerful and flexible way to write views in Django.
There are many different generic views available in Django, each with a specific purpose. Some of the most commonly used generic views are:
- ListView: Display a list of objects.
- DetailView: Display a single object.
- CreateView: Create a new object.
- UpdateView: Update an existing object.
- DeleteView: Delete an existing object.
Using these generic views can save you a lot of time and effort, as you don't have to write the views from scratch. Instead, you can simply subclass the appropriate generic view and customize it to your needs.
Using ListView to Display a List of Objects
The ListView is one of the most commonly used generic views in Django. It's used to display a list of objects, such as a list of blog posts or a list of products on an e-commerce site.
To use the ListView, you need to create a new view that subclasses the ListView class and specifies the model and template to use. Here's an example:
from django.views.generic import ListView
from .models import Post

class PostListView(ListView):
    model = Post
    template_name = 'post_list.html'
In this example, we're creating a new view called PostListView that displays a list of Post objects. We specify the model to use (Post) and the template to render the data (post_list.html).
To use this view in your URLs, you need to add it to your urlpatterns:
from django.urls import path
from .views import PostListView

urlpatterns = [
    path('', PostListView.as_view(), name='post_list'),
]
Now, when a user navigates to the root URL of your site, they'll be shown a list of all the posts in your database, rendered using the post_list.html template.
Using DetailView to Display a Single Object
The DetailView is used to display a single object, such as a blog post or a product page. To use the DetailView, you need to create a new view that subclasses the DetailView class and specifies the model and template to use. Here's an example:
from django.views.generic import DetailView
from .models import Post

class PostDetailView(DetailView):
    model = Post
    template_name = 'post_detail.html'
In this example, we're creating a new view called PostDetailView that displays a single Post object. We specify the model to use (Post) and the template to render the data (post_detail.html).
To use this view in your URLs, you need to add it to your urlpatterns:
from django.urls import path
from .views import PostDetailView

urlpatterns = [
    path('<int:pk>/', PostDetailView.as_view(), name='post_detail'),
]
In this example, we're using a URL pattern with an integer parameter (pk) to specify which Post object to display. When the user navigates to a URL like /post/1/, Django will use the PostDetailView to display the details of the Post object with a primary key (pk) of 1.
Using CreateView to Create a New Object
The CreateView is used to create a new object, such as a new blog post or a new product. To use the CreateView, you need to create a new view that subclasses the CreateView class and specifies the model and fields to use. Here's an example:
from django.views.generic.edit import CreateView
from .models import Post

class PostCreateView(CreateView):
    model = Post
    fields = ['title', 'content']
    template_name = 'post_create.html'
In this example, we're creating a new view called PostCreateView that allows the user to create a new Post object. We specify the model to use (Post), the fields to display in the form (title and content), and the template to render the form (post_create.html).
To use this view in your URLs, you need to add it to your urlpatterns:
from django.urls import path
from .views import PostCreateView

urlpatterns = [
    path('create/', PostCreateView.as_view(), name='post_create'),
]
Now, when a user navigates to the URL /post/create/, they'll be shown a form that allows them to create a new post.
Using UpdateView to Update an Existing Object
The UpdateView is used to update an existing object, such as updating a blog post or a product. To use the UpdateView, you need to create a new view that subclasses the UpdateView class and specifies the model and fields to use. Here's an example:
from django.views.generic.edit import UpdateView
from .models import Post

class PostUpdateView(UpdateView):
    model = Post
    fields = ['title', 'content']
    template_name = 'post_update.html'
In this example, we're creating a new view called PostUpdateView that allows the user to update an existing Post object. We specify the model to use (Post), the fields to display in the form (title and content), and the template to render the form (post_update.html).
To use this view in your URLs, you need to add it to your urlpatterns:
from django.urls import path
from .views import PostUpdateView

urlpatterns = [
    path('<int:pk>/update/', PostUpdateView.as_view(), name='post_update'),
]
Now, when a user navigates to a URL like /post/1/update/, they'll be shown a form that allows them to update the details of the Post object with a primary key of 1.
Using DeleteView to Delete an Existing Object
The DeleteView is used to delete an existing object, such as deleting a blog post or a product. To use the DeleteView, you need to create a new view that subclasses the DeleteView class and specifies the model and template to use. Here's an example:
from django.views.generic.edit import DeleteView
from .models import Post

class PostDeleteView(DeleteView):
    model = Post
    template_name = 'post_delete.html'
    success_url = '/'

    def get_success_url(self):
        return self.success_url
In this example, we're creating a new view called PostDeleteView that allows the user to delete an existing Post object. We specify the model to use (Post), the template to render the confirmation page (post_delete.html), and the URL to redirect to after the object is deleted (in this case, the root URL of the site).
To use this view in your URLs, you need to add it to your urlpatterns:
from django.urls import path
from .views import PostDeleteView

urlpatterns = [
    path('<int:pk>/delete/', PostDeleteView.as_view(), name='post_delete'),
]
Now, when a user navigates to a URL like /post/1/delete/, they'll be shown a confirmation page that allows them to delete the Post object with a primary key of 1.
Using ListView to Display a List of Objects
The ListView is used to display a list of objects, such as a list of blog posts or a list of products. To use the ListView, you need to create a new view that subclasses the ListView class and specifies the model to use. Here's an example:
from django.views.generic.list import ListView
from .models import Post

class PostListView(ListView):
    model = Post
    template_name = 'post_list.html'
In this example, we're creating a new view called PostListView that displays a list of all Post objects. We specify the model to use (Post) and the template to render the list of objects (post_list.html).
To use this view in your URLs, you need to add it to your urlpatterns:
from django.urls import path
from .views import PostListView

urlpatterns = [
    path('', PostListView.as_view(), name='post_list'),
]
Now, when a user navigates to the root URL of your site (e.g. http://localhost:8000/), they'll be shown a list of all Post objects.
You can also filter the list of objects displayed by the ListView by overriding the get_queryset method. Here's an example that only displays the 5 most recent blog posts:
from django.views.generic.list import ListView
from .models import Post

class RecentPostListView(ListView):
    model = Post
    template_name = 'recent_post_list.html'

    def get_queryset(self):
        return Post.objects.order_by('-created_at')[:5]
In this example, we're creating a new view called RecentPostListView that displays a list of the 5 most recent Post objects. We override the get_queryset method to return only the 5 most recent posts, sorted by their created_at field in descending order.
To use this view in your URLs, you need to add it to your urlpatterns:
from django.urls import path
from .views import RecentPostListView

urlpatterns = [
    path('recent/', RecentPostListView.as_view(), name='recent_post_list'),
]
Now, when a user navigates to the URL /recent/, they'll be shown a list of the 5 most recent Post objects.
Conclusion
Django's generic views provide a powerful and flexible way to quickly create views for your models. By subclassing the appropriate generic view class and specifying the model and other parameters, you can create CRUD (Create, Read, Update, Delete) views and list views for your models with just a few lines of code. This can save you a lot of time and effort compared to writing your own views from scratch.


